
Onboarding your clients can be automated.
Here’s how
I Dub Thee… “CLIENT” Phase.
Now your prospect can call themselves your client. What a fantastic accomplishment!
But as any coach/consultant knows, the work has only just begun.
To make the project you're about to do with them get off to a great start. You should set up an onboarding process.
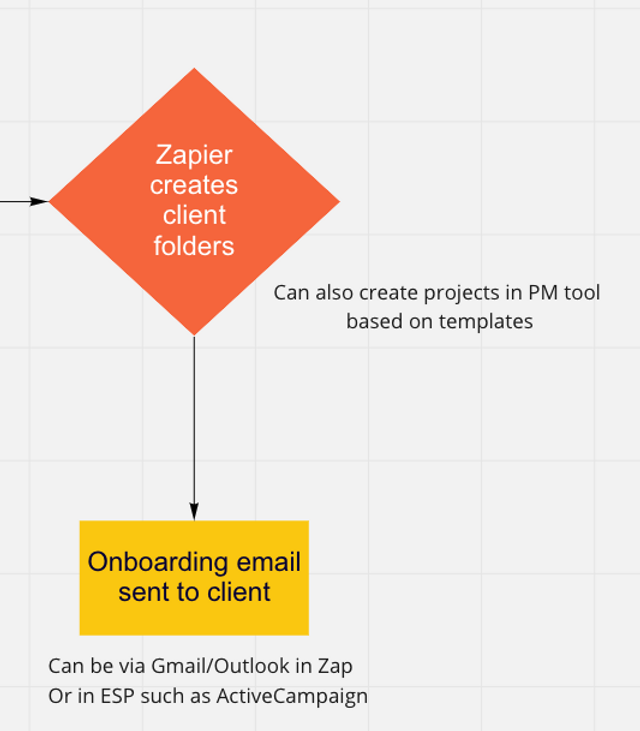
Let’s say you want to create a folder in Google Drive and insert a file into that folder that’s a template you will use for that client.
In the following Zap, I’ve created a trigger based on the payment status in a column in Airtable. [If you missed it, you can read it here.]
Once a project is marked as Paid, the Zap will trigger using a Last modified time field (I called it ‘trigger onboarding’).

The zap will create a folder in your Google Drive (you can define exactly where you want the folder to be located).
Note: when referencing folders, Zapier uses the folder ID and not the folder name. This enables use of dynamic folders created on the fly. So don’t worry if you change the name of your folders later on.
The next step in the Zap will copy an existing file into this folder. You can give the file a name. This name can be dynamic (based on the client name, for example) or static. This is great for putting templates in the client folder for you to use throughout your project.
This zap will also create a sub-folder called Client Files in the parent folder.
It will then give access to the client to this folder (and only this folder). The zap will also send the client an email with the shared folder URL. This is a great way for you to share information with your clients.
As part of the onboarding process, you will want to send your clients a welcome email.
This email can include all the information they need to start, any requests you have from them, links to any forms you need them to fill out, etc.
You can use a simple Gmail send, as I’ve set up in this Zap.
But using an email service provider, you can create a personalized email sequence suited exactly for your customer’s needs.
In your first email, you should include the following things:
- Welcome them aboard.
- Let them know exactly what they can expect over the course of your work together.
- Include a link to your shared folder (or task, if you’re using a project management tool).
- Use a custom field you create (%shared_folder%) and pass the URL to that field via Zapier when you create the folder.
- Ask them to book an initial meeting with you. If you are using ScheduleOnce, you can personalize this link by using the %FirstName% and %email% fields in the URL.
Your email will look something like this:
Hi %FirstName%,
So excited to be working together.
I’ve created a folder where we can exchange any documents. You can find the folder here: %shared_folder%.
In order to start working together, let’s set up a time to meet.
You can use the following link: https://go.oncehub.com/scheuling-link-url?name=%FullName%&email=%email%
When the email goes out, all the variables in the %% will be filled out automatically.
You can set a wait period to make sure they’ve set the date, and if they haven’t, you can send them a reminder to schedule the meeting.
Once the meeting has been set the automation can then send out a reminder the day before with more information.
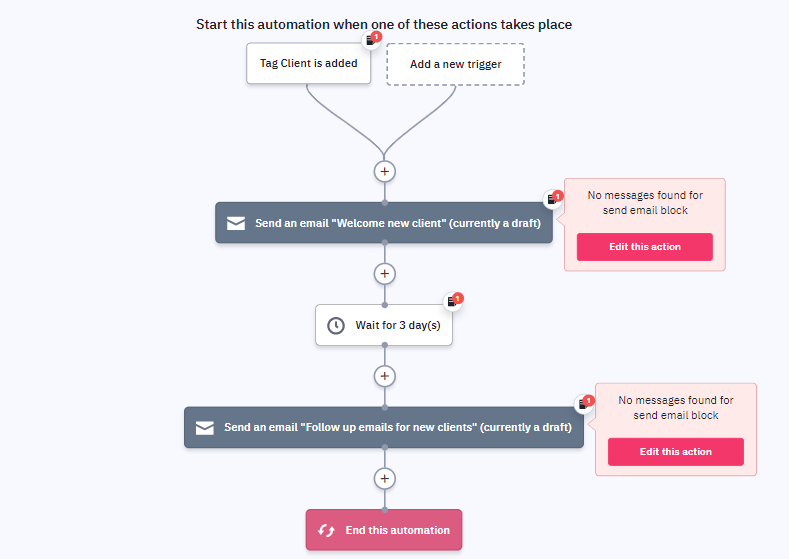
This automation can be tweaked and personalized a lot more with custom fields. But I’ve created the initial sequence for you to use in ActiveCampaign.
The automation will look something like this:

Note: you’ll need to create a separate list for Clients in ActiveCampaign, as well as a custom field to hold the kickoff discovery call date. You will also need to create a Zap to pass the date for this meeting from your scheduling tool to your email tool.
Or, if you prefer to skip the reminder, and simply have a two email sequence, it can look like this:
Make sure to go over each email, send yourself a test and see that the fields are populating properly.
Next → Putting the pieces together (and testing)
Feel like you needed a clip that would help walk you through this?
Maybe you needed the Zaps ready to go instead of fiddling with it?
Did you feel like you would have loved to have the Airtable databases themselves?
Well… I've got you covered.
I have a PDF that you can purchase that includes everything I mentioned above. You can basically plug it all in with the help of clips and your workflow sequence will be up and running in no time.

.png)